Everyone likes to create something with their own hands. It makes you feel like you are in charge of the outcomes and you feel a sense of satisfaction as a result of finishing a project by yourself. Instead of being a consumer, you can become a creator; instead of passive recreation, you can spend your time using your creativity to actively make something. You no longer have to get amazed by complex machinery and cast objects, you can very easily create your own bespoke metal objects at home in your own home foundry.
Yes, you not only possess the power to create your own home foundry, but you can also do it at an affordable price. Once you have finished making the home foundry, you will know how to melt metal and cast it into an amazing object that you can display in your back garden.
Creating a foundry in the home is fairly easy because you most likely have the majority of components present in your home that you require to construct a metal foundry at the house and to create your first mold.
Metal Casting - Not as Hard as You Think
Metal casting is a form of art carried out historically by people over centuries and even thousands of years. Contrary to what some may believe, it is not overwhelmingly hard, too complex or impossible, reserved only for those possessing professional expertise. Humans have been casting metals like brass, copper, aluminum, iron and even steel, into moulds for hundreds of years. You can do it too - metal casting does not require high skills.
If you are able to build a sandcastle, you can create a mold by yourself too. Moreover, if you can switch on the kettle to boil some water, it should not be difficult for you to melt the metal and cast it into the mould. This is that straightforward, really. Alright, maybe a better comparison would be previous projects using clay- but the message remains the same. All you need is our tips on how to create a home foundry.
Why should you cast metal at home?
Before we get started on how to cast metal in your own hobby furnace, we should tell you why it is even an endeavour worthy of doing in your spare time.
Not only is it a fun and fulfilling activity to create your own metal objects, but it is highly practical too. Instead of going out to buy metal components or paying for someone's services, you can have a degree of self sufficiency when you have your home foundry. For instance, if you need a certain part for your car or motorcycle, you can simply cast it in your hobby furnace which is much more cost efficient.
Not to mention, once you make a mold, you can reuse it for casting future metal objects and any unused scrap metal can also be utilised for subsequent projects. Therefore, there is no waste which makes it a lot more sustainable.
Most importantly, having a home foundry allows your creative genius and artistic imagination to run wild and free, as you have full agency over what you can make and how it will turn out. There are no limitations which you would otherwise experience with store bought components.
Metal foundry at home - Basic Materials and Elements
The Fuel
Even though the modern metal casting industry almost exclusively utilises a natural gas burner inlet, charcoal is the standard fuel used in a home foundry and was previously the king in the metal casting industry. Although you can also use a burner with a propane gas bottle, it makes sense to stick to the use of charcoal briquettes. They are cheaper, for a small fraction of the price and almost always available at your local hardware store.
Apart from being affordable and easily accessible, the charcoal fuel will power a home foundry regardless of where it is located.
Moreover, the charcoal may be generated directly on the premises without having to go to a local store to buy it. All you have to do is simply cover hardwood ricks with soil and enable them to smoulder for a few weeks from within. You can easily create your own charcoal to power your own home foundry.
Doing it on your own not only helps to save on costs but also has other benefits. For example, homemade charcoal does not produce binders that are often present in charcoal briquettes which are purchased from a shop. These binders /agents ultimately block the airflow within the furnace of your home foundry.
This method of charcoal processing also produces volatile and gaseous by-products such as carbon monoxide, wood, methane, alcohol and other components. These by-products can offer unique value by themselves as independent products.

Furnace - the heart of the foundry
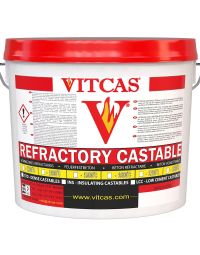
Naturally, before you begin the metal casting, you require a powerful foundry furnace to efficiently use the fuel and make your moulds. You can very easily create that kind of furnace using some scrap metal for a small fraction of the price. It will be similar to a drum, containing a flexible cover, that is lined with refractory castable /refractory concrete at approximately 50mm or two inches.
Refractory materials are heat resistant, able to withstand high temperatures while remaining stable. For example, refractory castable is similar to concrete or cement and it can be purchased in 25 kg containers, then combined to create a permanent foundry with the simple addition of water.
The oven should also have an air feed tube installed on the bottom which is fitted with an adjustable-for-flow blower to provide the draft needed to produce extreme heat. You can use an air compressor or even an old vacuum cleaner as an air blower.
Before creating the foundry and looking for a furnace, you need to decide how big the parts and metal objects you will cast will be in your home foundry. It is recommended that a novice user finds a vessel akin to a small sized, steel gas bottle or a small beer keg.
With these, you can easily build yourself a powerful and versatile foundry furnace of the appropriate height which will be suitable for most melting scrap metals. This tall furnace will be able to handle all casting needs and objects regardless of how odd they are shaped.
Crafting and casting aluminum is the least difficult foundry job (as compared to, for example, an iron casting as iron has a higher melting point). This is as a result of aluminium's low melting point. Not to mention, you can get almost entirely meltdown scrapped auto pistons. Many garages would even allow their customers to take them home and it is also worthy of note that they are made of an alloy of exceptional quality. Nevertheless, many come with connecting rods attached and the rods must be extracted out of the molten metal (combined with ferrous components found therein) prior to the aluminum being cast.
When a fitting furnace vessel has been picked, ready it by cutting off its cover at the upper seam first. Also, create an opening in its side near the bottom. This opening or hole needs to be wide enough to accommodate a feed pipe around 30-40mm in diameter.
Next, thread the 90-degree elbow towards this nipple's inner edge, then the pipe needs to be soldered to the wall of the canister and the elbow must be pointed upwards. Now, carefully make a hole in the centre of the segment of the roof. Once you have made a hole, you should now solder a 50mm muffler pipe in place, enabling the pipe to protrude slightly under the lip of the cover. Then fasten the handles, comprised of 3mm x 5mm flat stock short pieces and 15mm pipe 150mm pieces, to the container’s sides.
Although these instructions focus on casting aluminum, similar steps apply to casting other types of metals including iron, brass or copper. Of course, different things like the temperatures at which you melt will vary.
Refractory Lining
The cover, base and inner walls need to be filled with refractory cement or some other refractory material due to intensely high temperatures produced in the furnace. Vitcas supplies a dry mix 1700 Grade Refractory Castable in 25kg buckets which requires mixing with cold water. Simply mix the appropriate quantity of refractory concrete in compliance with the directions on your bucket, subsequently filling the bottom of the furnace jar until the air-feed elbow (around 30-50mm deep) is filled to the top with the substance.
Now coat the external side of the vessel that is smaller using a tiny amount of oil to make it easy to clean following the setting of the wall lining and position it upright above the elbow. It is a crucial point that the wall's lining remains its balance inside the furnace drum.
Next, go on to refractory fill in the wall's cavity as you have done at the bottom, tamping it down when you cast to prevent air bubbles from developing. Finish the whole thing in a similar way- invert the cover and line it to the muffler pipe point.
Refractory drying process
At the point of the refractory becoming dry, start a small charcoal fire and continue to burn the fire for a minimum period of 12 hours.
Make a disk of expanded metal that is approximately 3mm and only wide enough to fit into the furnace, then add a feed to the blower. If need be, use a welded plate, a coupling or a section of bicycle tube inside. Your foundry furnace should be ready to start creating useful, at-home moulds and objects from melted metals.
Refractory Protective Coating
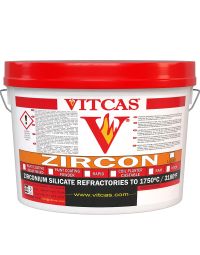
It is recommended to use a refractory coating to paint the lining with ready mixed zircon refractory paint coating which will stop any molten metal from sticking to it and to insulate the outside of the container which will make the process safer, more efficient and will improve the performance. Since the refractory paint coating is ready mixed, you do not need to combine it with water.
What is zircon?
Zircon is a refractory material which carries many useful characteristics which makes it ideal for use in many applications including in metal casting.
For one, zircon extends the service life of any surface it is used on, making it the perfect material for protective coatings. Zircon is also ideal for use with molten metal due to its low solubility. In addition to this, zircon has a low thermal conductivity, high thermal shock resistance and is resistant to corrosion. All these characteristics combined make it suitable for use in furnaces.
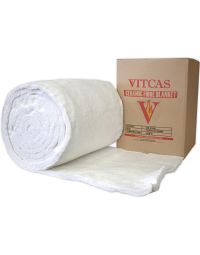
Foundry furnace - Insulation
It is highly advised to properly insulate the furnace by wrapping ceramic fibre blanket or aluminium coated glass fibre mat around the outside of the furnace. For even better performance, cover the ceramic fibre blanket with ready mixed zircon paint protective coating. The two products combined will offer maximum insulation for the furnace.
Casting Flask
This is yet another elemental component when it comes to creating a metal foundry at home. This crucial foundry part, the flask, can probably be built by yourself too.
It is simply an open-ended, two-part box that houses the sand that shapes the mould. Of course, the thickness of the flask (cope is the name of the top section, while drag is the name of the bottom part) relies on the scale of castings which you intend to pour and you can insert a small four-sided cheek between the various components to maximise the depth of the flask, if appropriate.
In order to create a flask by yourself, find some straight, flat 100 x 25mm wood then cut off eight sections: four around the length of 250mm and four that have a length of 300mm.
Now, cut eight 50mm pieces and render the two boxes by securing the boards using adhesive and M60 x 30mm wood screws. For a bigger flask, cut a 6mm x 15mm rebate into the inside of both the drag and cope to hold the sand.
Make sets of the keys to use for the sides of the flask. It is crucial that the cope and drag consistently fit the flush in order for the mould at the line of parting to separate cleanly.
Many people prefer to use rods or dowel pins in lieu of tapered buttons since when lifting, they give little room for error. For wood sealing, use a strong waterproofing agent.
You will also require a moulding bench and a riddle to design, which are not difficult to obtain. The riddle is effectively a soil sieve from a hardware store.
Eventually, make a minimum of two template boards by removing slightly larger plywood sheets than that of your cup, then sealing them using a wood sealer.
The Remaining Items
Here are some other components which you will need to create your first mold.
-
A section of 12mm tapered dowel (should be 150mm in length)
-
A wooden hammer handle
-
A smoothing dowel (12mm x 150mm) to act as a riser pin
-
Small knife blades and spoons
-
Iron rod (hook on one end, a handle on another)
-
A 150mm cast iron melting pot (crucible)
-
Scissor tongs
-
Straightedge for levelling
-
A camel's-hair artist's brush
-
Iron pans and iron pots
-
A baking tin (should not be aluminum)
-
A small-scale rectangular bread pan
-
A skimmer with a 2 ft rod handle
-
Casting sand
-
A rapper
-
Angle grinder
How to Make Your First Metal Mould?
Now you're ready to produce a small mould. Place your charcoal briquettes over the panel on the bottom of the furnace, spark it and turn on the blower. Fill up the crucible with scrap metal such as aluminum, copper or iron. Steel may not be the best option for metal casting due to its very high melting point as compared to other metals (although iron follows closely in second place with its high melting point).
Insert the crucible into the furnace with the coals hot and place the lid. During the waiting period for the alloy to melt, arrange about 25 litres of sand in your moulding bench and periodically spray water droplets into it. You should also keep tossing it with two wooden blocks to achieve a dry and paste-like consistency that allows it to stay whole when squeezed, but to break cleanly when released (you will probably have to put it into some practice before you have to squeeze).
Better still, blend the sand around 12 hours before metal casting, so its wicking action will have room for even distribution of the moisture.
Subsequently, place a form on your pattern board inside the moulding bench. Dust it by shaking a pumice through a sock.
Push the drag over the template upside down and sift the sand into the drag using the riddle. Pack the grains tightly around the pattern material.
Next overfill the drag box with sand, packing the sand properly at the corners. However, ensure to pack it slightly more gently over the pattern with the rammer. Using a template board to force the sand into the drag, make a horizontal motion downwards.
Cut the surplus material with your straightedge over the drag's edges and exhaust the mould via breaking the sand with a short, sharp coat-hanger wire in various positions above and below the pattern. Extract all the remaining sand using your bread pan.
Inspect the crucible to find out if the scrap metal /aluminum has melted. Bright red means too much heat and that the air-feed flow should be decreased in order to allow the molten metal to seethe while the mold is being finished.
Then, return and turn the drag on its right side upwards and dust the face with the template still inside. Now, gently put the cope on the wheel. Place the riser pin on the most thick section of the pattern, place the sprue pin in the drag sand around 5 cm away from the pattern, keep the riddle over the glove and perform the sifting, tamping and striking procedures as before.
With this done, dig a shallow pouring well, roughly 25mm deep and 25mm from the sprue button, with a knife and cut a pipe, half as long, from the pit right to the pin. Vent over the pattern, remove the sprue pins and riser carefully, finger-pressing the sand around the basin (be careful not to allow any material fall inside the hole left over from the riser pin). You should now gently detach the drag and cope from each other.
Dig a runner from the sprue in the drag sand, next to the template, stopping at a gap (which is a linking ditch leading directly to the pattern) and press down the sand as before. In some situations, more than one runner and gate may be used.
Next, swab a thin film of water around the edge of the template with your knife, and plan to extract the initial by first threading a small wood screw into a suitable section of it, then tap the screw back and forth and around with the rapper until the pattern loosens and raises easily.
Repair the mold if it is damaged in any way, blow any clay out of the impression area and replace the cope carefully, double-checking its fit.
You are now ready to make a pour but first ensure that you coat the moulding bench's exposed wood around the glass with sand.
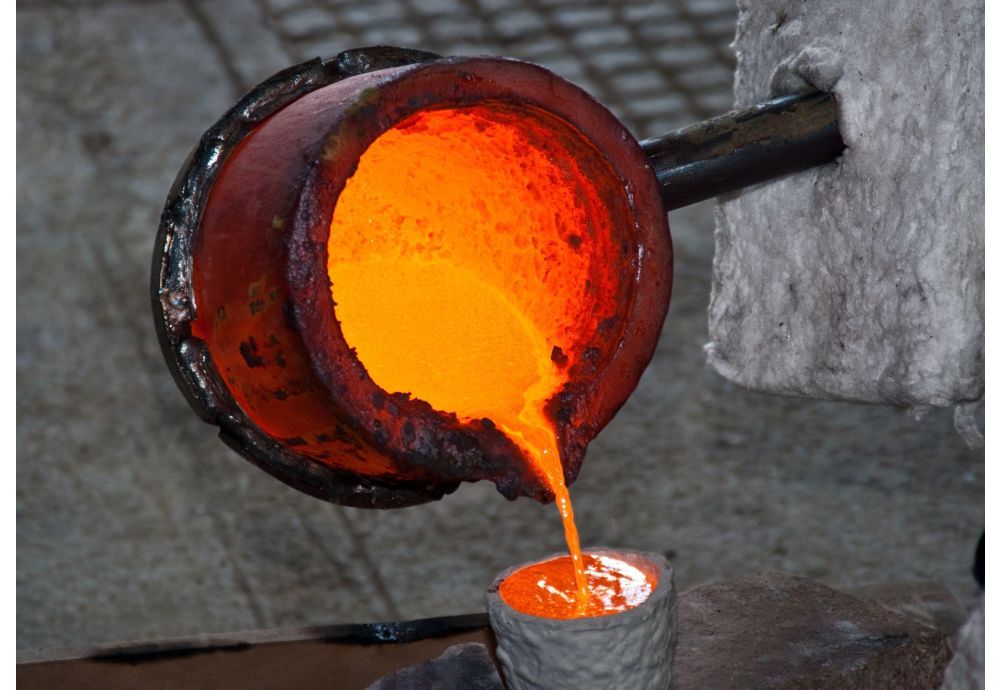
Casting metals in your Home Foundry
For starters, use your hook to open the furnace to extract any ferrous pieces from the crucible, then brush the slag off the top of the molten aluminum/other metal (though you should try not to disturb the melt too much!) and dump it into a waiting iron receptacle. Use the hook to remove the crucible from the oven, place it in an iron frying pan and hold it tightly with the pliers.
The molten metal must be poured into the basin and sprue until it falls out of the riser. The remaining aluminium fluid must be poured into a baking tin to create the ingots which you will re-melt at a later time.
When waiting to separate the mold (cooling the metal casting takes 20-30 minutes), you need to re-sift all excess sand and find a suitable storage space for it which will keep it sealed and secured for subsequent projects. You should also do this for the sand in the mold cavity after the casting has been finished. Now, gently and carefully smother your furnace fire and hold on to the cooled down coals as they will render your subsequent fires less difficult to initiate.
Finally, pop the metal casting out of the mold cavity and take a look. Do not be discouraged when the first steps are somewhat hard. You may hammer out research with a practice that is reliably appropriate for pressing, milling, spinning or some other form of machining.
There you go! You have now successfully crafted your first metal object in your very own home foundry. You will undoubtedly learn as you go and improve your skills with practice, but this is a simple tutorial for beginners to get started in the art of metal casting.
Health and safety considerations for metal casting in your foundry
Metal casting can be safe but only if you follow the necessary precautions to ensure the whole process runs safely and smoothly. When you melt a metal to cast a mold in your foundry, you need to be diligent and methodical. After all, you do not want to burn yourself, do you?
First of all, you need to ensure that you are wearing protective gloves or any other type of protective items such as eyewear, in case there are any splatters. You should also be careful that you do not touch any hot components (particularly the metals being cast) present in the furnace because you may severely burn yourself. Therefore, it is vital that you use tongs or pliers to take the crucible out.
Quality of crucible holding the molten metal
Your crucible needs to be of a high quality to ensure there is no leakage of the molten metal for the cast (whether it is iron, steel or other metal, the extremely high heat poses a serious danger). Check it to see if there is no hole or crack because this could result in an accident. If there is no hole or defects, it is safe to use; but if there are structural defects, purchase a new one to be safe.
Finally...
If you have taken all relevant safety precautions and have read our instructions, you can get started on making your very own home foundry and begin all your casting projects!