
Build Your Own Pizza Oven
Build Your Own Wood-Fired Pizza Oven
Build a bespoke wood-fired pizza and bread oven using VITCAS refractory and insulation materials designed for high-temperature outdoor cooking. Choose individual fire bricks and construction materials or start with the complete Outdoor Pizza Oven Kit, which brings together the core products required for a traditional firebrick oven.
A successful DIY pizza oven combines several different material functions: dense fire bricks store cooking heat, refractory cement and screed form heat-resistant joints and sections, ceramic fibre insulation limits heat loss, and the flue manages smoke and combustion gases. Precast arches, oven doors, chimney components and cutting tools can simplify specific stages of the build.
Before laying the first brick, establish the oven's internal diameter, cooking-floor height, entrance geometry and chimney position—those four dimensions determine the brick layout, dome curvature, working height and amount of refractory material the project will require.
-
 Special Price £180.00 £150.00 Regular Price £358.80 £299.00
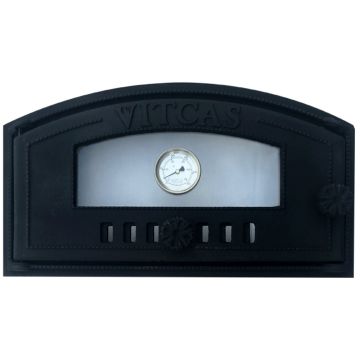
VITCAS Cast Iron Wood-Fired Oven Door with Glass and Thermometer is designed for pizza and bread ovens, featuring heat-resistant glass, an integrated thermometer with a 0–500°C (32–932°F) measuring range and dual °C/°F display. Supplied with a mounting frame and adjustable sliding air vent, the door allows viewing of the oven interior and monitoring of cooking temperatures.
Read more
How to Build a Wood-Fired Pizza Oven from Fire Bricks
Building a pizza oven from scratch gives you control over the cooking-floor size, dome or tunnel geometry, entrance, insulation thickness, chimney position and exterior appearance. The important part is to treat the oven as a layered thermal structure rather than simply a brick enclosure.
The refractory floor and chamber absorb and store heat, insulation reduces heat loss, the entrance and flue control the movement of hot gases, and the exterior system protects the finished oven from outdoor exposure.
DIY Pizza Oven Material Guide
| Construction Stage | Recommended VITCAS Material | Primary Function |
|---|---|---|
| Cooking floor and refractory dome | Fire Bricks 230 × 114 × 64mm | Dense refractory construction and thermal mass |
| Complete DIY material package | Outdoor Pizza Oven Kit | Core refractory and insulation materials for an approximately 1m oven |
| Doorway arch | Arch Fire Brick Set | Tapered refractory bricks for forming curved entrances and tunnel roofs |
| Precast entrance option | Outdoor Pizza Oven Arch for Door | Factory-formed refractory doorway section |
| Outdoor firebrick joints | Outdoor Oven Cement | Hydraulic-setting refractory jointing and exterior finishing |
| Larger tapered gaps and refractory shaping | Heatproof Screed | Filling larger gaps and forming compatible refractory sections |
| Insulation beneath the cooking floor | Ceramic Fibre Board 1260°C | Reduces downward heat transfer |
| Dome insulation | Ceramic Fibre Blanket 1260°C | Flexible thermal insulation around the refractory chamber |
| Fixing ceramic fibre insulation | Ceramic Fibre Adhesive | Secures compatible insulation to refractory surfaces |
| Exterior reinforcement | Pizza Oven Wire Mesh | Supports insulation and reinforces the rendered exterior |
| Door and temperature monitoring | Cast Iron Oven Glass Door with Thermometer | Retains heat and provides temperature indication for compatible oven designs |
| Smoke extraction | Chimney Flue with Cowl & Damper | Routes combustion gases and provides flue control |
Outdoor Pizza Oven Kit
The VITCAS Outdoor Pizza Oven Kit groups the principal refractory and insulation materials required to build a traditional firebrick pizza oven of approximately 1 metre internal diameter.
The current kit includes:
- 280 fire bricks for the cooking floor and refractory chamber
- 34 tapered arch bricks for the entrance
- 5 × 20kg Heatproof Screed
- 1 × 50mm Ceramic Fibre Board for base insulation
- 2 Ceramic Fibre Blankets providing approximately 7m total length
- Ceramic Fibre Adhesive
- Pizza Oven Wire Mesh
- 2 × 20kg Outdoor Oven Cement
Actual material quantities vary with the oven diameter, wall thickness, brick cuts, entrance design and exterior finish, so a custom build should be calculated from the selected geometry rather than assuming every oven requires the same quantities.
1. Plan the Oven Before Building the Base
Start by deciding the internal cooking-floor diameter or length, oven shape, entrance width and height, finished floor height and chimney position. These dimensions affect not only cooking capacity but also the number of fire bricks, arch geometry and finished footprint after insulation.
Allow additional space outside the refractory chamber for Ceramic Fibre Blanket, wire mesh, Outdoor Oven Cement and any decorative weather-resistant finish.
2. Build a Strong, Level Supporting Base
A brick pizza oven is heavy and requires a stable supporting structure. Depending on the installation, the plinth may be constructed from suitable masonry, concrete or another engineered support system capable of carrying the complete oven load.
The top surface should be level and adequately sized for the finished oven rather than only the internal cooking floor. If the design incorporates log storage beneath the oven, the opening should not compromise the structural support required above it.
3. Insulate Beneath the Cooking Floor
Dense fire bricks store useful cooking heat, but without base insulation some of that energy travels downward into the supporting structure. Ceramic Fibre Board provides a low-conductivity layer beneath the refractory cooking floor.
The 1260°C board is available in 25mm and 50mm thicknesses. The current VITCAS DIY Pizza Oven Kit includes a 50mm board for this part of the construction.
4. Lay the Firebrick Cooking Floor
VITCAS dense fire bricks are rated up to 1300°C and provide the thermal mass required for a refractory pizza-oven floor and chamber.
Select the flattest bricks for the cooking surface and keep the finished floor smooth so that a pizza peel can travel across it without catching on raised joints or uneven brick edges. A herringbone arrangement is one practical option because it reduces long straight joints in the direction of peel movement.
5. Construct the Entrance Arch
The entrance can be formed from individual tapered Arch Fire Bricks, a complete 17-brick arch set, or a precast refractory doorway arch.
A temporary timber, foam, polystyrene or sand former can support the arch while it is constructed. Tapered arch bricks reduce the wedge-shaped mortar gaps that occur when a curved opening is formed from rectangular bricks.
6. Build the Dome or Tunnel
A traditional pizza oven can use a circular dome, while an elongated oven can use a barrel or tunnel-shaped chamber. Circular domes can be constructed in progressively smaller rings, while barrel shapes generally require a temporary former during construction.
A trammel is useful when building a dome because it keeps successive bricks aligned to a consistent centre point and radius. This helps maintain the desired internal curvature as the dome closes.
Outdoor Oven Cement vs Heatproof Screed
Outdoor Oven Cement is a hydraulically setting refractory mortar intended for compatible exterior firebrick construction. VITCAS specifies it for suitable outdoor joints in the approximately 5–10mm range.
Where tapered dome construction creates gaps exceeding approximately 10mm, Heatproof Screed is the more appropriate VITCAS material for filling the larger refractory section. HPS is rated up to 1400°C.
Keeping the distinction between thin jointing and larger refractory filling helps avoid using mortar as a substitute for correctly shaped masonry.
Pizza Oven Building Tutorial & Trammel Video
For a visual construction guide, see the VITCAS step-by-step guide to building a pizza oven in six stages.
When constructing a brick dome, the VITCAS trammel demonstration shows how a central guide can be used to maintain the required dome radius while positioning successive bricks.
7. Plan the Door & Chimney Together
The entrance, flue opening and chimney should be designed as related components. In a typical wood-fired pizza oven, the flue is positioned towards the front of the chamber around the transition between the oven opening and entrance structure so that hot gases can be directed into the chimney.
The exact flue opening and chimney dimensions depend on the oven geometry. VITCAS supplies stainless-steel chimney components with a cowl and damper, together with 1m straight extensions and compatible 45° and 90° bends.
Do You Need a Pizza Oven Door?
A permanently open entrance is common during live-fire pizza cooking, where food cooks rapidly with the fire burning inside the chamber. A door becomes particularly useful when using retained heat for bread, roasting and slower cooking after the active fire has reduced or been removed.
The VITCAS Cast Iron Oven Glass Door incorporates heat-resistant glass, an adjustable air vent and a thermometer with a range up to 500°C.
8. Insulate the Brick Dome
Once the refractory chamber has been constructed and the required drying sequence completed, cover the dome with Ceramic Fibre Blanket. The blanket is rated up to 1260°C and provides a flexible low-conductivity layer around the curved brickwork.
Ceramic Fibre Adhesive can secure compatible insulation during installation. The insulation should then be retained with Pizza Oven Wire Mesh.
Why Pizza Oven Wire Mesh Is Used
The wire mesh is not itself an insulating material. It helps hold the flexible blanket closely around the dome and creates a reinforced base for the exterior Outdoor Oven Cement layer.
The build-up therefore has three separate functions: ceramic fibre provides insulation, mesh provides reinforcement, and the exterior refractory layer provides the finished protective surface.
9. Finish the Oven for Outdoor Exposure
Outdoor Oven Cement is water-insoluble and resistant to rain and frost after setting, making it suitable for compatible external pizza-oven construction.
The finished oven should nevertheless be detailed to prevent unnecessary water accumulation within absorbent brickwork and insulation. Decorative masonry paint, tiling or another compatible external finish can be added where appropriate to the chosen oven design.
Cutting Fire Bricks
Custom dome and entrance geometry frequently requires brick cutting. VITCAS supplies a Brick & Concrete Cutting Diamond Disc for compatible power tools where accurate refractory-brick cuts are required.
Plan cuts to maintain the intended internal oven profile and minimise unnecessarily wide joints, especially around the dome, entrance and chimney transition.
Drying & Initial Firing
New firebrick masonry, screed and exterior refractory layers contain moisture from construction. Allow the materials to cure and dry according to their product instructions before regular high-temperature cooking.
Initial heating should use a sequence of controlled fires so retained moisture can leave the oven progressively. The insulation and finishing sequence should also follow the selected construction method rather than enclosing wet refractory masonry immediately after building.
DIY Oven vs Pre-Made Oven
A DIY firebrick oven gives greater freedom over diameter, chamber geometry, entrance proportions, exterior design and integration into an outdoor kitchen. It also requires more cutting, refractory masonry and planning.
If the priority is a defined chamber geometry with less on-site refractory construction, consider the VITCAS Pre-Made & Modular Pizza Ovens.
Planning Your DIY Pizza Oven Build
- Cooking capacity: determine the required internal floor area before calculating materials.
- Support: construct a stable base for the complete finished oven weight.
- Base insulation: separate the refractory floor thermally from the support structure.
- Cooking floor: use smooth dense fire bricks with tight, level joints.
- Entrance and dome: plan their geometry together before beginning the curved masonry.
- Jointing: match Outdoor Oven Cement or Heatproof Screed to the required joint or gap size.
- Flue: establish the chimney opening and route before closing the dome and entrance structure.
- Dome insulation: use ceramic fibre blanket rather than relying on dense refractory masonry as insulation.
- Exterior: reinforce and protect the insulated oven from outdoor weather exposure.
- Drying: complete the curing and controlled initial-firing sequence before normal cooking.
A DIY pizza oven works best when every layer is designed before construction starts: the firebrick chamber stores the heat, the insulation keeps that heat around the food, the entrance and flue manage the fire, and the exterior protects the thermal system you have built underneath.
Frequently Asked Questions About Building a Pizza Oven
How many fire bricks are needed to build a pizza oven?
The quantity depends on the internal diameter, chamber shape, wall thickness, entrance and number of brick cuts. As a reference, the current VITCAS Outdoor Pizza Oven Kit for an approximately 1m-diameter oven includes 280 standard fire bricks and 34 arch bricks. Larger or differently shaped ovens require a separate calculation.
Can ordinary house bricks be used to build a pizza oven?
Suitable ordinary masonry may be used in parts of the supporting structure that remain outside the high-temperature zone. The cooking floor, dome and other directly heat-exposed parts should use refractory bricks designed for repeated high-temperature service.
Should pizza oven floor bricks be mortared together?
The cooking surface should primarily be flat, stable and free from raised joints that can catch a pizza peel. Follow the selected oven design for the floor bedding method and keep refractory jointing materials out of the exposed cooking surface where they are not required by that design.
Is a herringbone pattern necessary for a pizza oven floor?
No, but it is a useful layout. Angling the brick joints relative to the oven entrance reduces the likelihood of the leading edge of a pizza peel repeatedly crossing a continuous straight joint.
When should Outdoor Oven Cement be used instead of Heatproof Screed?
For this outdoor application, VITCAS Outdoor Oven Cement is suited to compatible firebrick joints of approximately 5–10mm. Where the dome geometry produces gaps larger than approximately 10mm, Heatproof Screed is better suited to filling the larger refractory section.
Is insulation necessary if the pizza oven is made from thick fire bricks?
Yes. Dense fire bricks provide thermal mass rather than low-conductivity insulation. Ceramic Fibre Board beneath the floor and Ceramic Fibre Blanket around the chamber reduce heat transfer away from the stored-energy system.
Where should the chimney be positioned on a wood-fired pizza oven?
The flue is commonly incorporated towards the front of the oven around the transition between the refractory chamber and entrance. Its exact position and dimensions should be established as part of the oven geometry before the dome and doorway are completed.
Do I need a door if the oven is mainly for pizza?
A door is less important during rapid live-fire pizza cooking, but it becomes useful when retaining residual heat for bread, roasting and slower cooking. It can also support temperature management during suitable stages of the firing and cooling cycle.
What does a trammel do when building a pizza oven?
A trammel maintains a consistent distance from the centre of the oven to each brick being positioned in the dome. This makes it easier to control the radius and internal curvature as successive brick courses rise and close towards the top.
Where can I watch how a brick pizza oven dome is built?
See the VITCAS six-step pizza oven construction tutorial and the trammel demonstration video for additional visual guidance on DIY oven construction.